 AIREITER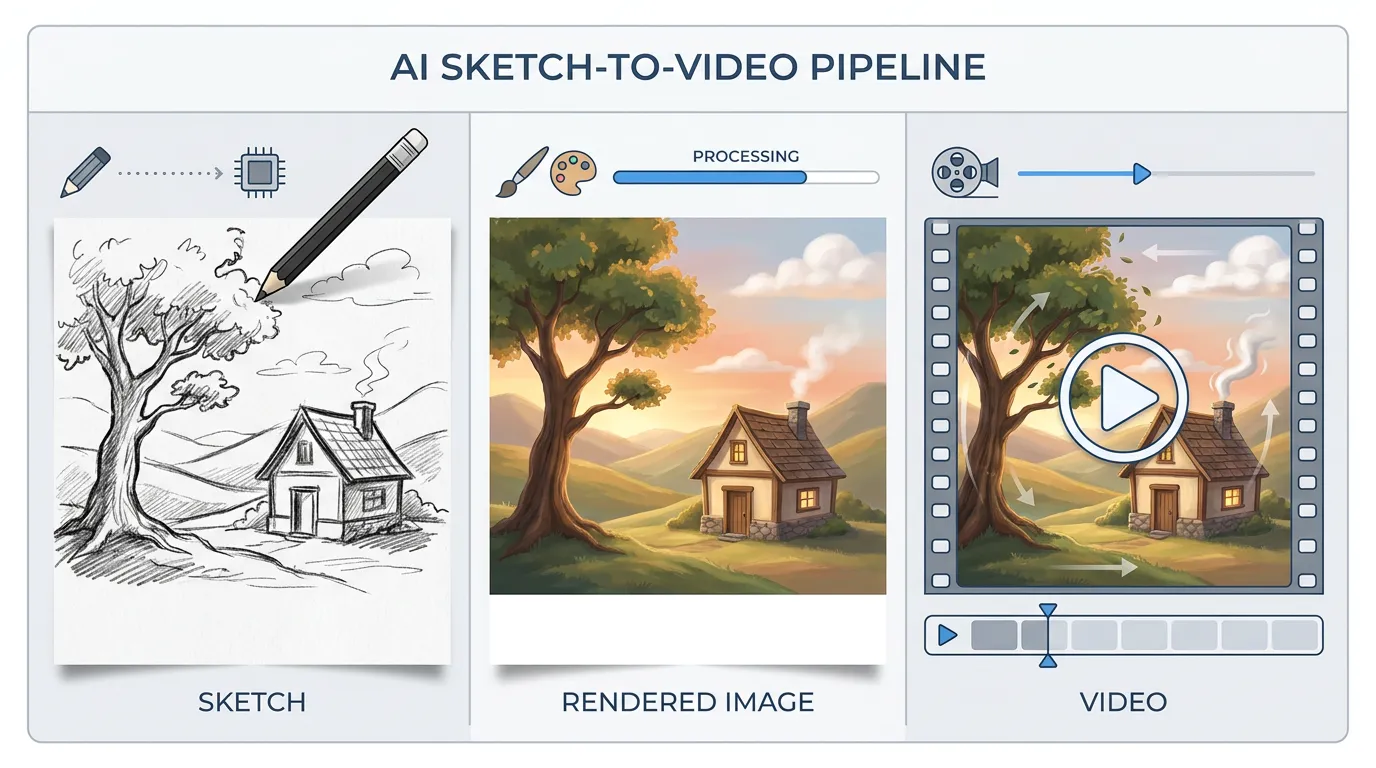
Most sketch-to-video tools work through a two-step process internally: your drawing is first rendered into a finished still image, then that still is animated. Running those steps yourself, rather than feeding a sketch into a black box, is what lets you decide whether the output looks like your drawing or like an AI's reinterpretation of it.
What Sketch to Video AI Actually Is
Sketch to video AI converts hand-drawn sketches, wireframes, or storyboard frames into animated or fully rendered video clips. The drawing provides composition and spatial layout; the AI fills in textures, lighting, color, and motion. A rough stick figure with clear placement can work as well as a polished illustration, because the AI reads structure — where things sit in the frame — rather than artistic quality.
There is no single "sketch-to-video model." Adobe's Firefly tutorial describes exactly three stages: you provide a sketch, Firefly generates a rendered still image from it, and then Firefly animates that still into a five-second clip. Higgsfield's Sketch-to-Video feature, powered by Sora 2, bundles those stages behind five preset buttons (Realistic, Cinematic, Anime, Commercial, Horror) so the steps are invisible — but the rendering-then-animating sequence still happens internally. If you run the two steps yourself — first refining your sketch into a clean still, then feeding that still to a video model — you get to inspect, adjust, and re-prompt at the midpoint, which is where most quality problems are fixed.
Two Routes: Dedicated Tools vs the Pipeline
The practical choice is between a bundled tool and a manual pipeline.
Dedicated tools — Higgsfield Sketch-to-Video, Dreamina's sketch-to-video tool, sketchtovideoai.com, and Seedance's storyboard-to-video page — take your drawing directly, often without requiring a text prompt, and return a finished clip. They are fast and require the least expertise. Higgsfield offers 1080p output in 16:9 or 9:16, Sora 2 as the engine, and motion inferred from linework alone. The trade-off: you cannot inspect or edit the intermediate rendered image, and your control levers are limited to whatever presets the tool exposes.
The pipeline route means you pick an image model to render your sketch, inspect the result, then pick a separate video model to animate it. Community workflows on Reddit show this pattern frequently: a creator draws, uses AI for style renderings and an initial mesh, then finishes the work manually.
"AI helped speed up the process of bringing this sketch to life." — u/Snoo-73452, r/2D3DAI
The practical rule: use a pipeline when you need to approve the rendered composition before animation; use a bundled tool when speed matters more than fine control.
The Workflow: Paper Sketch to Animated Clip
Prepare the Sketch
The AI reads spatial structure, not artistry. Three things determine whether your sketch produces predictable output:
- Spatial separation. Objects at different depths should be visually distinct. Overlapping lines at the same position get interpreted as a single flat shape, producing unconvincing depth.
- Subject definition. Your main subject should stand apart from the background in line weight or density. If the focal point blends into its surroundings, the model cannot identify what to animate.
- Clean, high-contrast lines. Digital sketches outperform photographs of paper drawings because they carry less visual noise. If you must photograph a paper sketch, shoot it flat under even light, crop tightly, and boost contrast before uploading.
Step 1 — Turn the Sketch Into a Rendered Image
The first generative step converts your lines into a finished still image. You pair the sketch with a text prompt that specifies what the lines represent and how they should look. A workable prompt formula:
"[subject], [visual style], [lighting], [specific details the sketch cannot convey]"
For example, a rough sketch of a room becomes: "A mid-century modern living room, warm natural light, photorealistic, with a wooden desk, a laptop, and a coffee cup on the left side."
Image models that accept a reference image alongside text — including Nano Banana Pro, Seedream 5 Pro, and GPT Image 2 — can fill in the rendering while drawing on the sketch's composition. Adobe Firefly's image model does the same within its integrated workflow. The key at this stage is to check the rendered still before animating it. If the composition drifted, the lighting is wrong, or the model invented details you did not want, fix it here by adjusting the prompt — it is far faster than regenerating an entire video.
Step 2 — Animate the Rendered Frame
Once you have a clean rendered image, feed it to an image-to-video model with a motion prompt. This is where you specify what moves and how: camera movement ("slow push-in from left"), subject motion ("the woman turns her head and smiles"), and environmental motion ("gentle wind through the curtains, dust particles in light beams").
Strong image-to-video models for this step include Kling 3.0, Seedance 2.5, Veo 3.1, and Runway Gen-4. VidAU's guide describes this as the most underused technique: most people skip the text prompt entirely and let the model guess the motion. A specific motion prompt — naming the camera move, the speed, and which elements are still vs. moving — produces intentional direction rather than random artifacts.
Step 3 — Review, Fix, and Chain Shots
Check four things on every generated clip:
- Motion naturalness. Does the movement match the scene type? Architectural walkthroughs should be slow and smooth; social clips need energy in the first second.
- Composition fidelity. Did the video drift from the rendered still's framing? Models sometimes crop or reframe unexpectedly.
- Structural integrity. Watch for flicker, warped geometry, limbs that morph between frames, and line weights that change mid-clip. These are the signature failure modes of sketch-derived video, and they typically stem from an ambiguous input sketch. The fix is upstream: a cleaner, more spatially separated input produces fewer artifacts downstream. If warping persists, reduce the motion strength setting or shorten the clip duration — more motion in a longer clip gives the model more room to break.
- Speed appropriateness. Motion that is too slow for a vertical social clip, or too fast for a cinematic establishing shot, signals a mismatch between the prompt and the intended platform.
For multi-shot sequences, generate each shot from its own rendered still rather than trying to chain one long generation. Seedance and Higgsfield both support start-frame and end-frame control for transitions between storyboard beats, which helps maintain continuity across cuts.
What Each Tool Costs
Pricing varies by model, resolution, and clip length. Figures below are from official pricing pages and verified guides as of August 2026.
| Tool | Entry plan | Per 5-second clip | Best for |
|---|---|---|---|
| Runway Gen-4 | $12/mo, 625 credits | 60 credits (Gen-4) or 25 credits (Turbo) | Cinematic b-roll, establishing shots |
| Adobe Firefly | $9.99/mo, 2,000 credits | 100 credits (540p) to 500 credits (1080p) | Integrated sketch-to-image-to-video workflow |
| Kling AI | $6.99/mo, 660 credits | ~10–25 credits per 5s clip | Dynamic action scenes |
| Higgsfield | From $9/mo (region-dependent) | Credit-based, varies by model | One-click sketch animation, no prompt needed |
| Seedance 2.5 | Pay-per-clip via API platforms | ~$0.48 for 5s at 720p | Reference-first consistency across clips |
Two numbers are worth noting from the rate cards. Runway's API rate is $0.01 per credit, making a five-second Gen-4 Turbo clip cost roughly $0.25. Firefly's Standard plan yields 20 five-second clips at 540p but only 4 at 1080p. Kling's free tier gives 66 credits every 24 hours (watermarked, non-commercial); its Standard plan covers roughly 26 to 66 clips depending on quality settings.
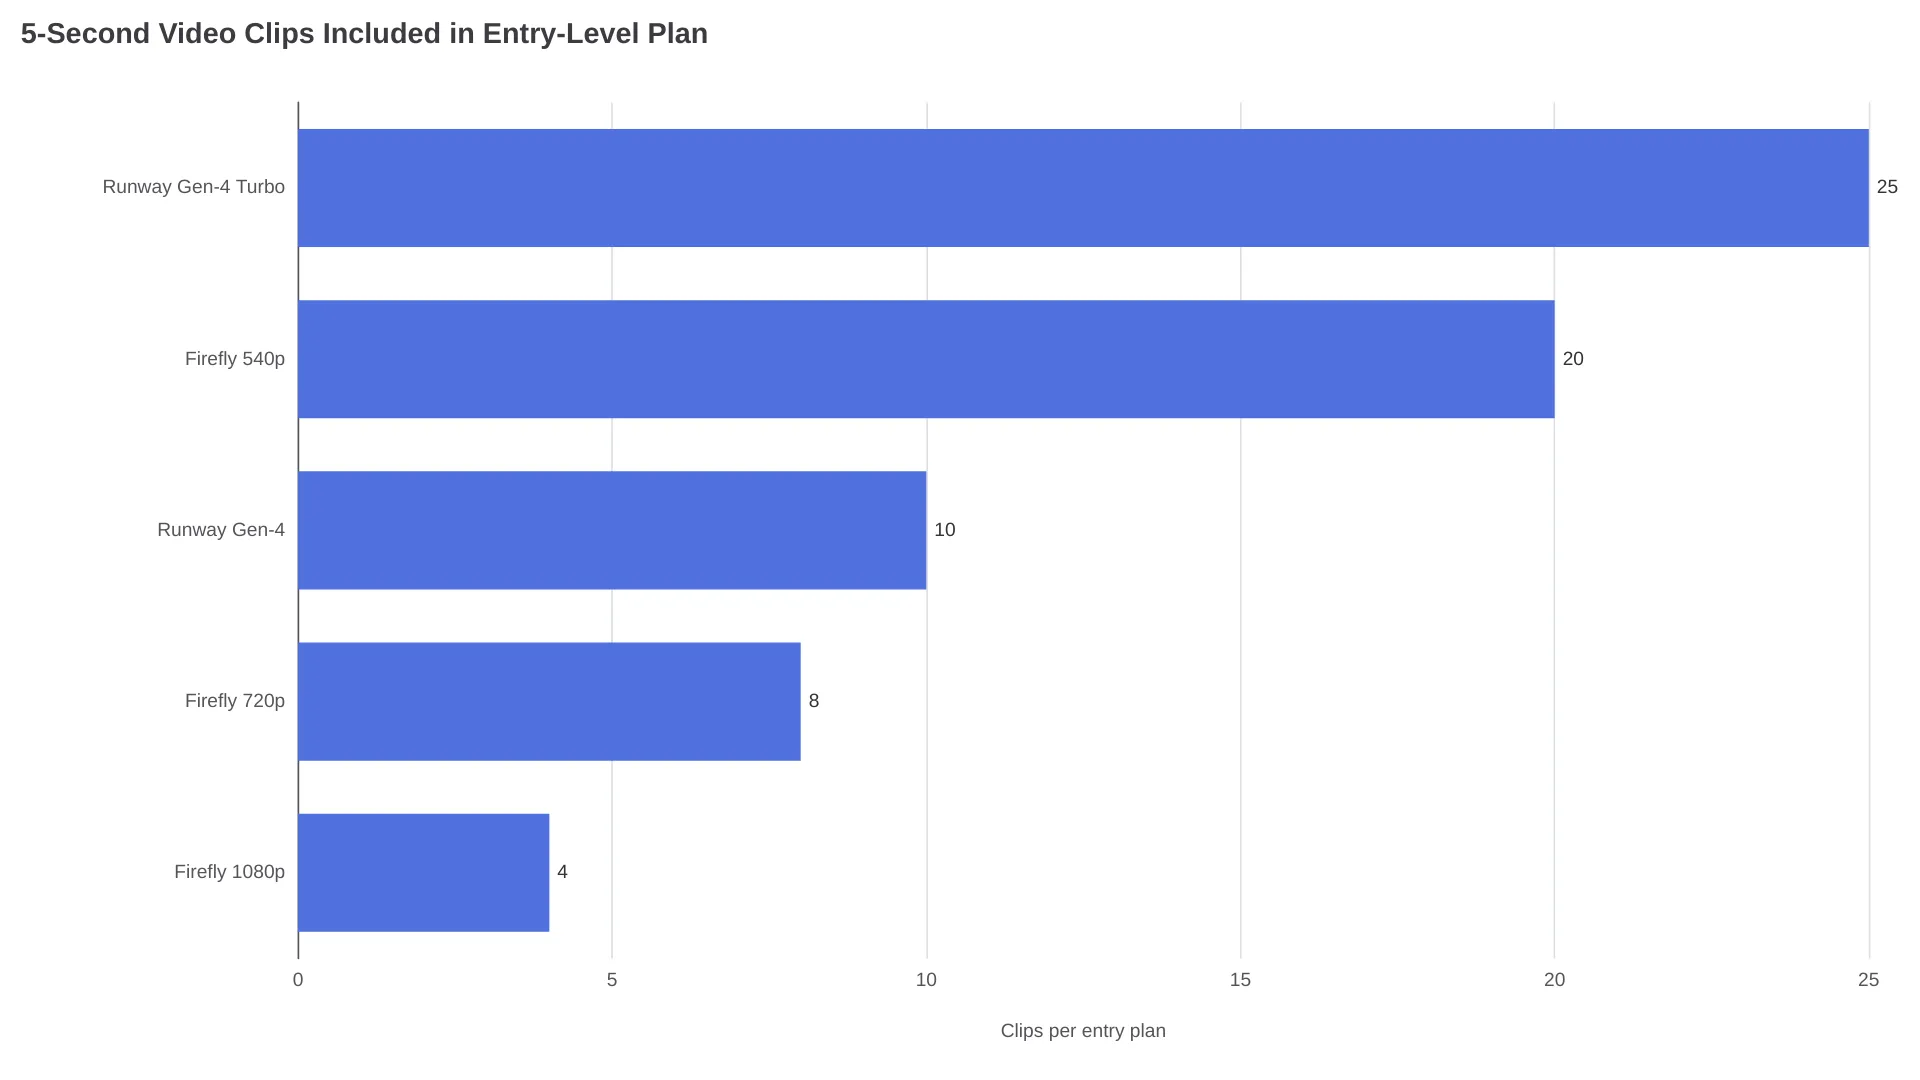
For many iterations of the same sketch, Runway Gen-4 Turbo or Firefly at 540p stretch credits furthest. For a small number of high-quality 1080p clips, Firefly at 1080p or Runway Gen-4 (non-Turbo) produce more polished output per clip.
Keeping Your Original Drawing Intact
The most common complaint about sketch-to-video output is that it does not look like the original drawing. The model reinterprets rather than renders — a pencil sketch becomes a photorealistic scene, or a line-art character gains shading and color the artist never intended. Whether that is a feature or a bug depends on your goal.
To preserve a hand-drawn or line-art aesthetic, tell the image model explicitly. Phrases like "keep the original line art style, minimal shading, flat illustration" anchor the rendering closer to your drawing. If you are running locally with ControlNet, the lineart or scribble ControlNet module is the precise tool for this: it locks the model to your edge map and prevents it from inventing new structure.
To preserve character consistency across multiple clips, use the rendered still from Step 1 as a reference image for every subsequent generation. The Seedance 2.5 reference-first architecture is specifically designed for this — it treats the input image as the character anchor and generates motion around it rather than reimagining the subject each time. Without a reference frame, the model generates a new interpretation of your character on every run, and faces, clothing, and proportions drift.
The Free Route: ComfyUI With ControlNet
If you have a capable GPU and do not want to pay subscription fees, the entire pipeline can run locally and free. A community-tested ComfyUI workflow from r/StableDiffusion chains together several open-source models:
- ControlNet (lineart or scribble module) locks the generation to your sketch's edges, preventing structural drift.
- Flux or a Stable Diffusion checkpoint renders the sketch into a finished image using your text prompt for style.
- Wan or AnimateDiff animates the rendered still into a short clip.
The trade-off is setup time and hardware. ControlNet plus Flux plus a video diffusion model often needs roughly 16 GB of VRAM for a comfortable full pipeline, though requirements vary by model, resolution, and quantization. Rendering a single five-second clip can take several minutes on consumer hardware versus seconds on cloud infrastructure. The route avoids platform watermarks, and commercial-use rights depend on the licenses of the specific models and checkpoints you install rather than a platform's terms.
Which Route Fits Your Sketch
| Your situation | Recommended route | Why |
|---|---|---|
| Fast ideation, social clips, one-off experiments | Dedicated tool (Higgsfield, Dreamina) | No prompt needed, presets handle the pipeline for you |
| Client pitch or pre-visualization where composition must match | Cloud pipeline (image model → video model) | Inspect and fix the rendered still before animating |
| Tight budget, heavy iteration, comfortable with local tooling | ComfyUI + ControlNet + Wan/AnimateDiff | Free, maximum control, no platform watermarks |
| Need character consistency across multiple clips | Pipeline with reference-frame model (Seedance) | Reference-first architecture prevents identity drift |
| Rough storyboard with multiple shots | Pipeline with start/end-frame control | Manage each shot separately for cleaner transitions |
FAQ
Is there a free sketch to video AI?
Kling AI offers 66 credits every 24 hours (watermarked, non-commercial). Higgsfield and Dreamina allow some free creation. For unrestricted free use, a local ComfyUI pipeline with ControlNet and AnimateDiff costs nothing but requires a capable GPU.
Will it work with a rough stick figure?
Yes, if the spatial placement of elements is clear. The AI reads composition, not artistic quality: where objects sit relative to each other matters more than how well they are drawn.
How is sketch to video different from image to video?
Image-to-video animates a finished photograph. Sketch-to-video starts from raw drawn input and generates both the visual and the motion. In practice, most tools render the drawing first, then animate it — so the animation engine is the same; the difference is the starting point.
Which model preserves my original drawing best?
ControlNet's lineart or scribble module gives the tightest structural lock locally. Among cloud tools, a reference-first video model like Seedance 2.5 anchors the animation to your input and minimizes reinterpretation.
How long can the generated videos get?
Most image-to-video models produce clips of 5 to 10 seconds per generation. For longer sequences, plan on generating and editing multiple short clips rather than relying on one long pass. Start-frame and end-frame control help maintain continuity between clips.